Back to the workbench again.
Total relaxation. Just the third and final panel to assemble and solder. I left the most complicated part of the design to the last panel. Only one piece of internal lead was to be 1/4", the rest was to be 3/16". It all went together quite quickly.
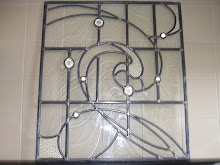
I arranged the four panels on the bench. The leads undulated from left to right. Lead came of similar sizes followed on from one another. They worked well together.
We held the panels up to the artificial light, as the natural light outside had dimmed somewhat.
It was going to look good!
Saturday, 15 November 2008
Thursday, 13 November 2008
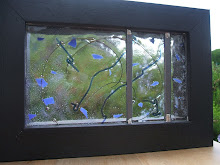
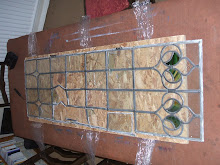
Small Panels
I had another session with the small panels today.
The second panel only needed the last two sides of the perimeter to be leaded. Very quickly the lead was cut and the coloured glass was persuaded into the channel. Onto the soldering. Very little to do since there were not many pieces. Unplug the iron.
I put the two soldered pieces on the workbench, arranged as they would be viewed in situ. Leaded curves of varying thickness meandered as designed.
Better make a start on the next. Which thicknesses of lead are required this time? Check the pattern. 3/16" and 1/4" for the internal leading. (Yes - still in imperial) At least one real life example of why fractions should be understood... at last I've found it! Yes, 1/16" does make quite a noticeable difference! Having spent the largest portion of one's life measuring in centimetres, it does seem strange reverting to imperial. But then, it is an old craft.
Wednesday, 12 November 2008
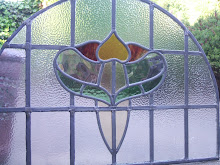
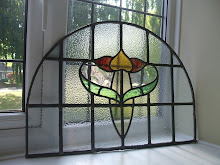
Cleaning Up
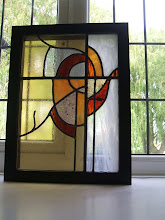
Each panel on both sides of the glass needed tidying, removing the excess cement. An easy job. Cleaning the lead came required the donning of gloves. Next, attaching metal ties that would further strengthen the panel - was not quite so easy. I always feel an extra pair of hands would be useful at this point, as the metal always seems to wriggle out of place when solder is applied.
Lead darkening next. Lead darkens naturally over time, but not everyone wants a bright, new finish and is prepared for nature to take its course.
Further cleaning. The glass this time. Get rid of the smears... make it look squeaky clean.
Time for a photo call. So different from when it arrived, broken and forlorn. Now it looked bright, strong and proud, ready for service for the next few decades.
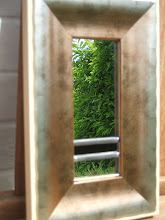
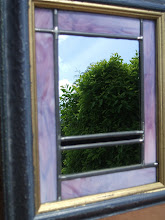
A Change of Scene
I thought I'd ring the changes yesterday, and work on something else. Four small panels to replace some clear, bullseye glass.
I'd already cut out the glass, so only the soldering iron would be pressed into action. Thankfully the workbench was all clean, and I had laid out the pieces.
Although only small, these panels still required the attention and care of the previous panel as they were bound for a domestic setting.
Starting, as usual, was the tricky bit - setting up the jig, preparing the lead and positioning the design in the correct place. It was fairly plain sailing after the first piece had been placed. I had cut the pieces accurately and they slotted in like a dream.
I used up my spare lead first - it's a very expensive commodity at the moment. Some suppliers are not even publishing the prices in their brochures - the customer having to phone to find the latest prices - such has been the latest price hikes. (Not their fault)
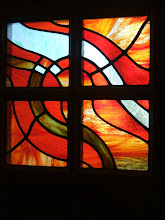
The lead was an important part of this design, different widths following curves that linked all four panels to create a unified artform. Not able to resist, once soldered, I held up the small piece against the natural light. Although grey outside, the glass came to life in a glorious glow of vibrant colour.
It gave a warm feeling, far removed from the temperature and scene outside.
I'd already cut out the glass, so only the soldering iron would be pressed into action. Thankfully the workbench was all clean, and I had laid out the pieces.
Although only small, these panels still required the attention and care of the previous panel as they were bound for a domestic setting.
Starting, as usual, was the tricky bit - setting up the jig, preparing the lead and positioning the design in the correct place. It was fairly plain sailing after the first piece had been placed. I had cut the pieces accurately and they slotted in like a dream.
I used up my spare lead first - it's a very expensive commodity at the moment. Some suppliers are not even publishing the prices in their brochures - the customer having to phone to find the latest prices - such has been the latest price hikes. (Not their fault)
The lead was an important part of this design, different widths following curves that linked all four panels to create a unified artform. Not able to resist, once soldered, I held up the small piece against the natural light. Although grey outside, the glass came to life in a glorious glow of vibrant colour.
It gave a warm feeling, far removed from the temperature and scene outside.
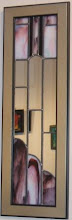
Tuesday, 11 November 2008
Flux
With the all clear to proceed, it was on with the soldering and the application of flux. Just a very short while to wait until the bright, shiny tip of the iron was at the required temperature to do its job.
Quite a few joints needed soldering. Neat soldering was the order of the day, as the piece of glass would be situated in a place affording close scrutiny. (Unlike church glass which is viewed and admired from afar.) Once the first side was complete, careful handling would be required to turn the glass to its reverse side for soldering.
The messy bit next. It always seems to take much longer than anticipated, but both sides were soon completed. At last the glass resembled what I had imagined the original had once looked like. All bright with long lengths of straight lead came.
A photo opportunity - get the camera out!
Subscribe to:
Posts (Atom)